


Check out Brian's MIB2 PQ Retrofit, in his 2015 Passat.
Components Used:
Steps:
Remove original stereo
- Carefully remove the trim which is around the stereo. This piece of trim is large and goes all the way across the dash from the right of the steering wheel all the way across to the passenger side door and under the climate control knobs. It is only held on with clips so use a trim removal tool to take it off.

- Remove the original head unit, it is held in by 4 screws.
Bluetooth Microphone Install
- Take the upper dome light parts down. The grill covering the microphone can be popped off using a trim removal tool and below that there are some screws. Remove the entier assembly.
- The OEM microphone itself is nearly identical to the replacement, remove it.

- The OEM wiring to the original microphone goes toward the drivers side. It goes to the MDI unit in the center console and removing the original wiring is not needed, just tuck it away into the headliner - tape it off with some foam if you are concerned about rattles.
- The new microphone wire I recommend running towards the passenger side. It is easier to get the wire situated if you remove the sun visor to allow the headliner to come down from the roof a bit. This can be tricky to remove - I recommend looking up a video.
- Remove the A-Pillar trim. To do this remove the piece of interior trim below the A-pillar first and then the A-pillar trim itself. There is a screw hidden behind the "airbag" label. You can carefully pop this piece of plastic out to get access to the screw. I recommend looking up a video on how to remove the a-pillar trim so you don't damage it.

- Use some sort of fish to go from the a-pillar area to the dome light area. I used a solid core single piece of household romex wire I had lying around.

- Run the microphone wire down along the blue tube being careful not to interfere with or disturb the airbag.
- Using the same piece of fish wire you used in the ceiling, feed it through the passenger side area behind the access panel. I found this area to work for me.

- Pull the wire up and behind the black plastic and tape the microphone wire to it.

- Carefully pull the microphone wire to the location of the stereo.


- At this point you are done with the microphone. You can reassemble the ceiling and passenger side trim at this point or do what I do and leave it all apart until you verify everything is working.
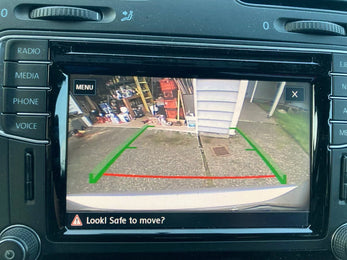
Rear View Camera Swap
- Open the trunk and remove the plastic trim on the trunk door. Remove your license plate as well. Remove the OEM camera. Remove the two 10mm nuts and remove the original camera. There is a short harness between the camera and the chassis harness. Unplug it and remove the original camera.
- You will have to remove the original short side of the harness that goes between the car harness and the camera for re-use. This might require cutting the original wire. You need the 2-pin connector from the original harness for the new camera. This controls the latch button. Plug this connector from the original harness into the new camera unit.

- Install the new camera unit by feeding it in from the outside. It snaps into place only and does not re-use the original 10mm bolts.
- Connect the original harness bit we re-used to the original vehicle harness which runs towards the passenger side of the vehicle.
- Run the new harness from the camera unit toward the drivers side of the vehicle.
- Remove the black trim that covers the trunk hinge arm.
- Puncture a slot or hole into the rubber grommet and feed all of the wires from the new harness through here. The provided instructions want you to connect the yellow and black wires before this grommet and only feed the other section through, but I recommend feeding it all through and making the connections elsewhere.

- Run the new wire along side the OEM wiring and down into the trunk.
- Remove the bottom of the trunk panel, the foam supports and the black plastic trim which runs along the bottom where the trunk catch is. Remove all visible trim clips which hold the grey carpeting material down and peel the material back to expose the drivers side wheel well area.
- Continue to follow the OEM wiring with the new wire until you reach the rear driver side wheel well. The OEM harness splits off here and there is a factory grounding point. Attach the black wire with the ring terminal to this factory grounding point. In the factory harness find the blue wire with the red stripe and trim away some of the wrapping tape to give yourself some space.
- Install the provided wire tap and spade terminal to this blue/red wire. Tidy up and excess wiring and tape/zip tie the new harness down along the OEM harness.
- I do not recommend re-installing any of the trunk trim until you have fully tested everything as this reverse signal wire tap is a common point of troubleshooting.

- Remove the bottom of the back seat and fold down the rear driver side seat back. Remove the trim bits which are covering the OEM harness which we are following. The large door sill trim is difficult to remove. I recommend starting at the front by the drivers seat because the tabs which hold the door sill trim down by the back seat need to have the trim slid towards the front of the car to remove or else you will break them. There is also one screw holding this piece down.
- Continue to run the new wiring harness along the OEM wiring in the door sill being careful to route around the seat belts and things just as the OEM harness does.
- Remove the hood latch, kick panel trim, and fuse box cover. Get the new wiring harness up into the fuse box area and tidy up your work.
- Using the provided "add-a-fuse" find a fuse location which is always on so that the trunk latch will always work. I used fuse location 16 which is a 5 amp fuse. (the photo has it in a different spot which might also work but I ended up moving it during some troubleshooting).
- Using a crimping tool, trim and crimp the red wire from the harness we fed up here into the add-a-fuse plug.


- Just as with the passenger side use the fish wire to find a path from the fuse box to behind the stereo.

Run the USB Port / AUX Cable
- I tried finding a different place to mount the USB port than inside the center console arm rest. I don't think there is one. The USB port and plug are very long/deep. The driver side glove box cubby doesn't have enough space behind it, nor does the center console cubby or passenger glove box.
- Pull up on the cup holder area and pop the center console trim up. You can reach under it and push on a yellow looking button to release the shift lever so you can shift out of park to give you a bit more freedom of movement. You can't remove this entirely without removing the shift knob so I recommend just dealing with it as is while being careful not to pull out and of the plugs around the shifter / start button. You may want to unplug them just to be safe.
- Pull up on the center console storage cubby and pop it out. It is pretty difficult to get out around the shifter and you have to unplug the lighter socket to get it out completely.
- Remove the MDI portion from inside the armrest and unplug it. This assembly can be removed by popping it out of the clips by pushing it toward the front of the car, there are no screws.

- On the MDI assembly remove the black box which has the iPod connector on it. This is the bluetooth/MDI module and you will not be keeping it. There are 4 screws holding a white plastic frame which need to be removed.


- Using the same fish wire you have been using, fish the wire from the shifter area to the area where the OEM harness comes into the bottom of the armrest. We will pull the new harness for the USB port from this direction.
- Pull the usb wire harness with the green socket part first from the armrest to the shifter area and work it behind the plastic where the storage cubby backs into to avoid having the wires interfere with it. Get the harness back to the area behind the stereo.
- Install the USB/Aux port onto the hole where the iPod/MDI plug used to be. It isn't a perfect location but I was unable to find anywhere else that would have been any better. On the plus side you don't have to cut anything. I used high temp hot glue on the back / underside of the plate to secure it.
- I opted to put a piece of black electric tape on top of the original AUX port since it is no longer functional.

- If you plan to use a wireless dongle or stow your phone in the armrest you are done with this part. Personally I wanted to have my USB port in the front of the car and to be able to continue to use a magnetic mount for my phone while using wired android auto/carplay.
- Due to this I decided to run a USB type-c cable back from this port to the front cubby along the same path as the harness. Be careful not to interfere with the parking brake cables/lever and make sure all of your wires are at a safe distance from it. I used the little access panel at the bottom of the armrest for this.


- At this point all of your needed harnesses are at their destination and you can install the MIB2 unit. Follow the provided instructions to put the camera pins into the blue harness (microphone harness) and insert the blue and green harnesses into their spots. This will require removing the existing blue harness from the block and inserting the one we ran with the microphone and installed the camera pins into.

- The additional large locking harness from the original stereo will no longer be used.
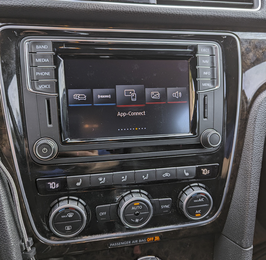
- When everything is plugged in as it should be you will be left with this:

Finished Result

Troubleshooting:
- If your trunk latch button doesn't work, you didn't plug the 2-pin harness in from the original harness or you didn't choose an always-on fuse.
- If your camera does not display a picture the most likely reason is the reverse wire tap.
Leave a comment